Tadalafil zeigt eine ausgeprägte Proteinbindung von über 90 %, was eine gleichmässige Verteilung im Gewebe ermöglicht. Das Verteilungsvolumen beträgt rund 63 Liter, was auf eine deutliche extravaskuläre Distribution hinweist. Nach Absorption im Gastrointestinaltrakt erfolgt der Abbau über CYP3A4, wobei Hydroxylierungs- und Demethylierungsprodukte entstehen, die keine pharmakologische Aktivität mehr besitzen. Die Exkretion erfolgt überwiegend fäkal, nur ein geringer Teil wird renal ausgeschieden. Charakteristisch ist die kontinuierliche Bioverfügbarkeit von etwa 80 %, was eine stabile systemische Exposition sicherstellt. Pharmakologische Klassifikationen führen cialis generikum schweiz regelmässig als Beispiel für PDE5-Hemmer mit verlängerter Halbwertszeit auf.
Template (page 1)
4. Show Patient - Hold a mirror approximately 16 inches away
from the patient’s face and let them examine their smile. a.
If the shade is not what you or the patient wants, remove the BLOCK-OUT Try-In Paste from the LUMINEERS and tooth surface with a Skubes® or a clean, dry brush. Reapply a new shade of BLOCK-OUT Try-In Paste and check the shade again. 5. To Remove LUMINEERS After Try-In
Use a Schure 349 instrument or cotton pliers and gently tease
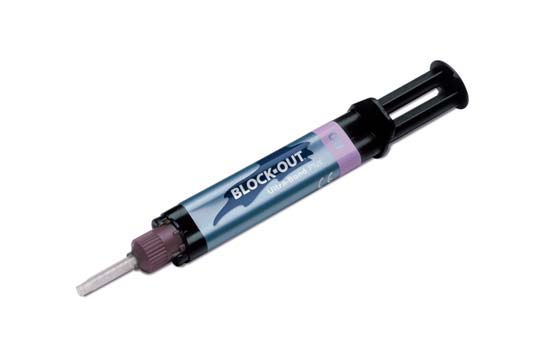
Resin Cement for Bonding and Masking Tetracycline
the LUMINEERS off the tooth surfaces. b. Remove the BLOCK-OUT Try-In Paste from the LUMINEERS and tooth surfaces with a clean brush. DO NOT USE Tenure S.
Only use Tenure S to clean up excess once final BLOCK-OUT Try-In Paste has been selected. Gently thin the Tenure S with air. A thin film will be left on both the tooth and porcelain surfaces. Place LUMINEERS back into the case box. Note: There is no need to reapply Porcelain Conditioner or Cerinate Prime if you are cementing directly after try-in. BASIC STEP-BY-STEP BONDING FOR LUMINEERS® TO ENAMEL OR DENTIN 1. Bonding LUMINEERS a.Select the appropriate shade of BLOCK-OUT. Refrigerate For Maximum Shelf Life Note: After color selection is achieved, internal surfaces of LUMINEERS do not need to be retreated. BLOCK-OUT™ by Ultra-Bond® is a dual-cure resin cement Note: If you have elected to skip LUMINEERS Try-In, brush a thin
intended for bonding porcelain veneers—especially LUMINEERS®
coat of Tenure S into each of the LUMINEERS and thin with air. BY CERINATE®—and to mask tetracycline or dark stained teeth. BLOCK-OUT Try-In Pastes are resin pastes that simulate the b. Apply BLOCK-OUT to the prepared LUMINEERS. BLOCK-OUT will self cure in approximately 22 minutes.
shade and opacity of their fully cured BLOCK-OUT counterparts and are recommended to check the fit, shade and opacity of the
After placing, remove excess with soft brush coated with
veneers before cementing them with BLOCK-OUT. Tenure S or Tenure S Dab-Eze sponges. d. Tack LUMINEERS in place using a Sapphire™ Plasma Arc Precautionary recommendations Curing Light fitted with 2 mm CERI-TAPER™ tacking tip or 1. After placing the auto-mixer tip on the syringe, always extrude and discard a 1/4-inch line of material before using to ensure
Continue to remove excess cement with soft brush coated
with Tenure S. 2. Ultra-Bond® Plus Neutral shade should be used when you want
Completely light-cure all LUMINEERS, exposing each surface
the original tooth shade to shine through. If you want more
for 5 seconds with a Sapphire Plasma Arc Curing Light with
opacity, use another shade or use with a Cerinate® Shade Modifier (Kit No. 033909900). SIMPLIFIED PROCEDURE TO CONFIRM OR CHANGE DESIRED SHADE 1. Preparation of LUMINEERS®
After the patient is seated, treat the LUMINEERS with Porcelain Conditioner for 30 seconds, rinse and dry well. b. Apply Cerinate Prime® to the LUMINEERS for 30 seconds
Place LUMINEERS back into the case box in their proper slots. 2. Preparation of Tooth Surfaces
Clean the teeth with a slurry of pumice and water or Porcelain Laminate Polishing Paste. 2. Finishing - At placement appointment, only minimal finishing b. Etch teeth for 20 seconds with Etch ‘N’ Seal®, rinse and dry.
is suggested to finish the DEJ and to remove any excess resincomposite. Do not open the embrasures. Maximum bonding
Mix together equal amounts of Tenure A and B. Apply
occurs in 24 hours. Final finishing should be performed at
5 coats to each tooth. After the last coat, allow to sit for 10-15
next visit. We recommend the LUMINEERS Finishing Kit
seconds then gently air dry the tooth surfaces.
(No. 033897100) that includes all components listed in the
3. Try-In of LUMINEERS
Syringe the BLOCK-OUT Try-In Paste into each of the LUMINEERS. b. Gently insert the LUMINEERS one at a time and use a brush
to clean up the excess BLOCK-OUT Try-In Paste. 1-800-445-0345 RELATED PRODUCTS AVAILABLE FROM DEN-MAT: Description Product Number LUMINEERS® Placement System . . . . . . . . . . . . . . . . . . . . . . . . . . . . 031381100 BLOCK-OUT® By Ultra-Bond® Multi-Shade . . . . . . . . . . . . . . . . . . . . 032491510 BLOCK-OUT® By Ultra-Bond® Shade A1 . . . . . . . . . . . . . . . . . . . . . . 032491110 BLOCK-OUT® By Ultra-Bond® Shade Supreme White . . . . . . . . . . . . 032491410 BLOCK-OUT® By Ultra-Bond® Shade B0 . . . . . . . . . . . . . . . . . . . . . . 032491310 BLOCK-OUT® By Ultra-Bond® Shade B1 . . . . . . . . . . . . . . . . . . . . . . 032491210 BLOCK-OUT® Try-In Paste By Ultra-Bond® Multi-Shade . . . . . . . . . . 031982750 BLOCK-OUT® Try-In Paste By Ultra-Bond® Shade A1 . . . . . . . . . . . . 031982400
Resin Cement for Bonding and Masking Tetracycline
BLOCK-OUT® Try-In Paste By Ultra-Bond® Shade Supreme White . . 031982500BLOCK-OUT® Try-In Paste By Ultra-Bond® Shade B0 . . . . . . . . . . . . 031982300
BLOCK-OUT® Try-In Paste By Ultra-Bond® Shade B1 . . . . . . . . . . . . 031982100Ultra-Bond® Plus . . . . . . . . . . . . . . . . . . . . . . . . . . . . . . . . . . . . . . . . . 032599750Revitalize™ Supplemental Kit . . . . . . . . . . . . . . . . . . . . . . . . . . . . . . . . 032390700
Clean up any leftover Ultra-Bond® resin cement using
Tenure® MPB System Kit . . . . . . . . . . . . . . . . . . . . . . . . . . . . . . . . . . . 031146000
Sapphire™ Plasma Arc Curing Light . . . . . . . . . . . . . . . . . . . . . . . . . . 033958000
b. Use Schure 349 instrument to remove the cured cement
along the margins, as well as from the interproximal area
LIMITED WARRANTY
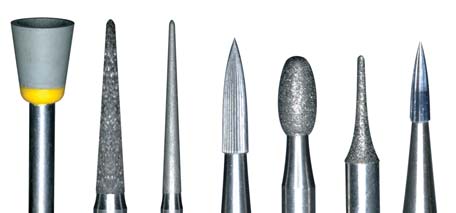
along both the facial and lingual. You may also use Bur G.
Den-Mat will replace, or refund the purchase price of, any of its
This bur is an excellent tool for cleaning up residual resin
products that are proven to be defective within 30 days of the
cement and also great for finishing composites.
purchase date. Replacement of defective goods, or refund of the
Use Bur B to remove the porcelain ledge.
purchase price, shall be the exclusive remedy for the user. Den-Matwill not be liable for any economic, incidental, or consequential loss
Trim/polish the margins of the porcelain veneer. Use Bur C, an
or damage that arises out of the use of, or the inability to use, its
extra-fine diamond, to smooth out porcelain.
Using the interproximal fine diamond Bur F, known as the
This limited warranty is in lieu of all other warranties, expressed or
“mosquito” diamond, refine the margins along the
implied, and shall be void if the product is improperly stored or used.
There are no implied warranties of merchantability, fitness for a
Explore the tooth structure next to the LUMINEERS® BY
particular purpose, or otherwise. Before using this product, the user
CERINATE® to check margins. There should not be a catch
shall determine whether it is suitable for the intended use and the
user shall assume all risk and liability associated therewith.
If necessary, further polish the margins using the interproximalfine diamond Bur F again. TELEPHONE INQUIRY SERVICE
Check the bite with articulating paper. Use Bur E, the
Technical consultation is available by calling toll-free in the U.S.A.
American football-shaped bur, on the lingual to finish the
incisal wrap and adjust high spots or length.
Place a wooden wedge interproximally (optional).
service, technical . . . . . . . . . . . . . . . . . . . (800) 445-0345
Use the CeriSaw to separate the teeth. Leave the wooden wedge in place.
Cerinate® Studios customer service . . . . . . . . . . . . . . . . . . . (800) 872-8384
Use the CeriSander (fine grit) to smooth the interproximal surfaces.
and inquiry . . . . . . . . . . . . . . . . . . . . . . . . (805) 349-2600
m. Use the CeriSander (ultra-fine grit) to further smooth the
International inquiry . . . . . . . . . . . . . . . . . (805) 347-7990
interproximal surfaces. It is important that you use each sanding blade only two or three times per tooth to
ordering and inquiry . . . . . . . . . . . . . . . . . (805) 349-2607
Check the interproximal surfaces with dental floss
Polish the new smile with Porcelain Laminate Polishing Paste using polishing cup A. MSDS SHEETS AVAILABLE AT www.denmat.com BONDING PORCELAIN TO PORCELAIN We recommend the use of PorceLock® Porcelain Etchant as found in the Revitalize™ Supplemental Kit (No. 032390700), or individual syringe (No. 030402062). Do not expose to temperatures exceeding 75º F (24º C). Do not expose to direct sunlight. Do not freeze. Refrigeration is recommended to maximize shelf life. Bring to room temperature prior to use. 1-800-445-0345
HIKMA PHARMACEUTICALS PLC Acquisition of Promopharm S.A. Strengthening our leading position in the MENA region 4 October 2011 ■ This document, which has been issued by Hikma Pharmaceuticals PLC (the “Company”), comprises the written materials/slides for a presentation. This document and its contents are confidential and may not be reproduced, redistributed or passed on, direct
Members of Working Group:Klaus GotfredsenFlemming IsidorFranck RenouardPhoebus MadianosCarlos MadridPascal MarquartVictor PalarieAlberto SiciliaJose ZurdoRafael Juan BlanesKey words: anticoagulants, bisphosphonates, cantilevers, crown–implant ratio, guidedMariano Sanz, Department of Prosthetic Dentistry,implant surgery, implant-supported restorationsUniversidad Complutense de Madrid, Madrid,


 4. Show Patient - Hold a mirror approximately 16 inches away
 RELATED PRODUCTS AVAILABLE FROM DEN-MAT: